
Back to blog

How to Upload to IPFS with Presigned URLs

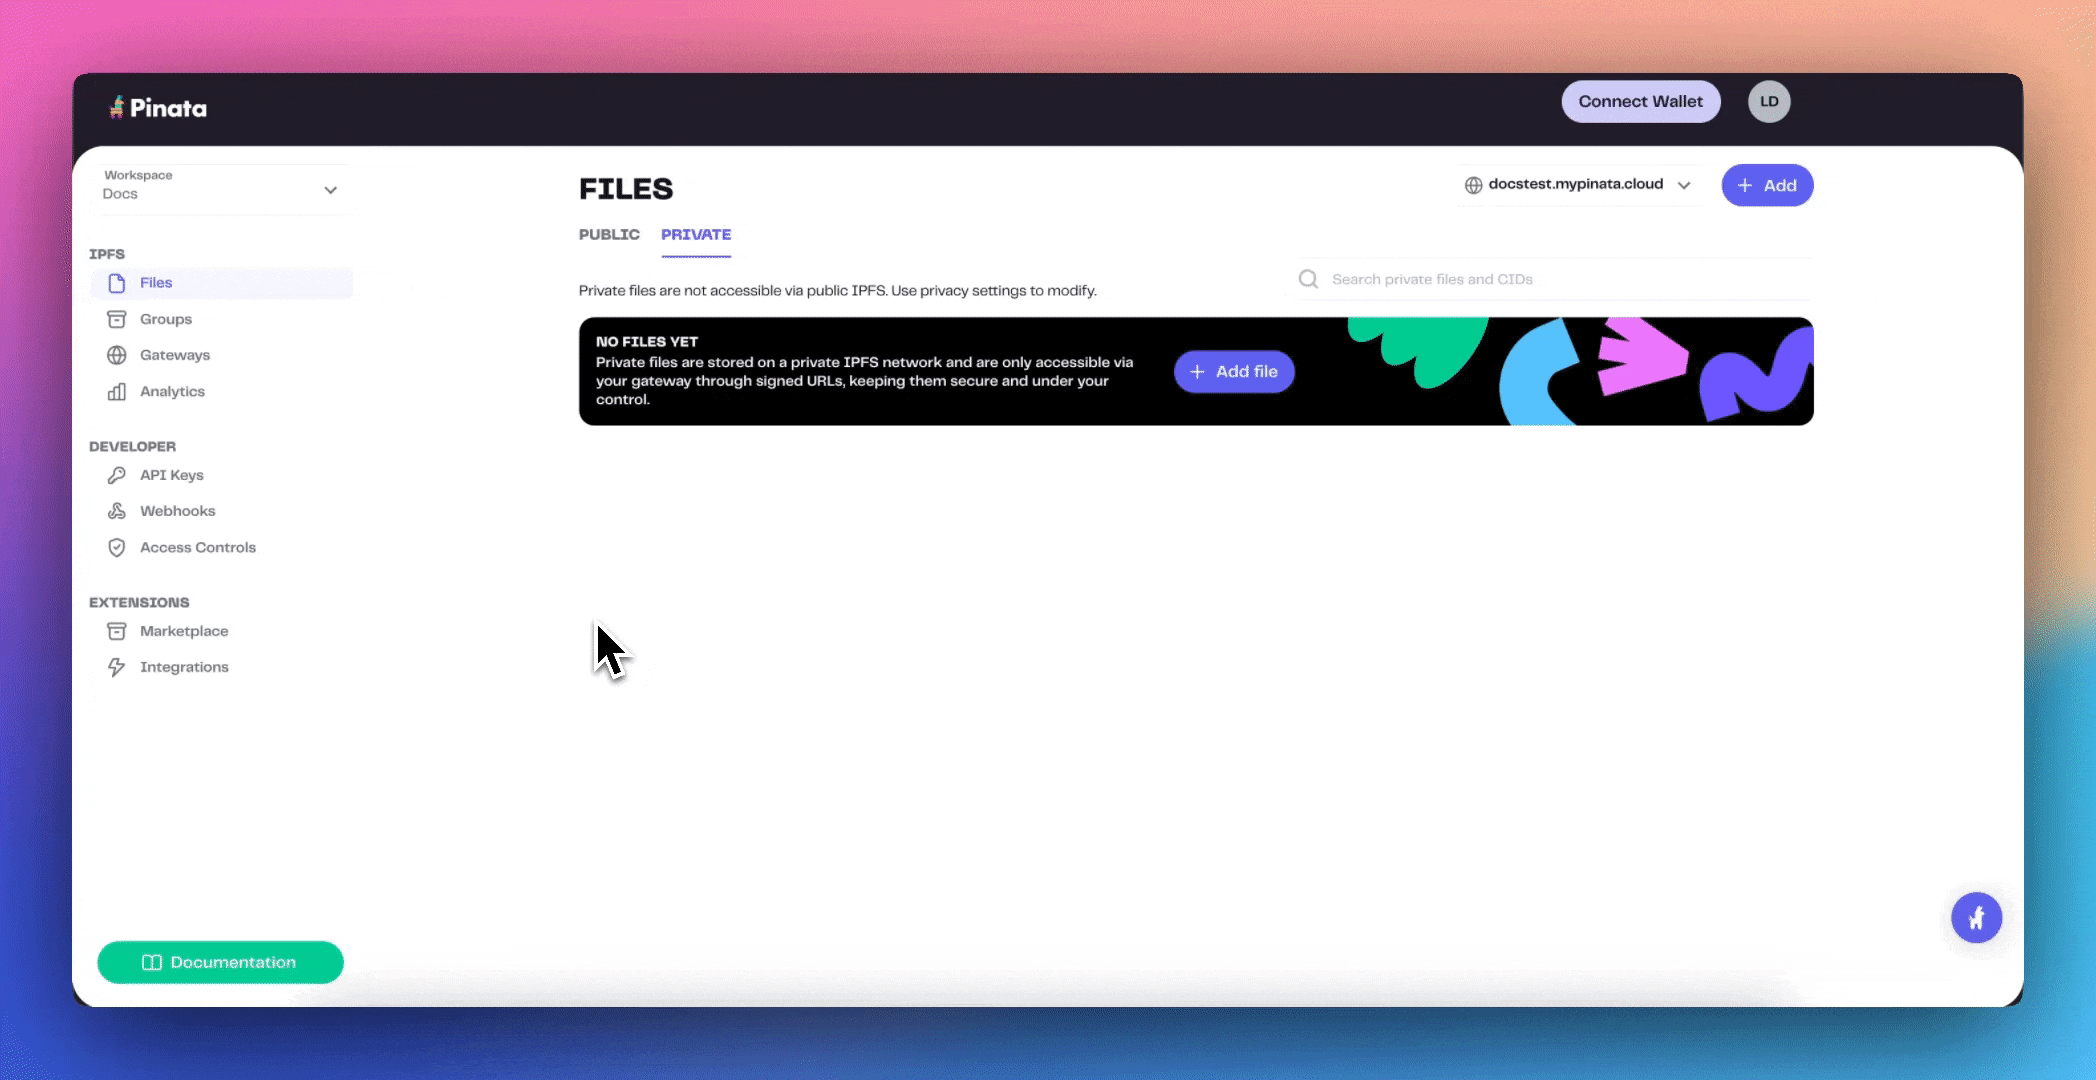
We have lots of developers who look for examples of how to upload files to Pinata using React, however there is one critical issue with that approach: API key security. React is a client side framework, which means that if you use an API key inside, then it’s going to be publicly available for anyone with the right knowledge. On the flip side, it’s pretty crucial to have the ability to make client side uploads. Most frameworks like Next.js, which do have server-side API routes, have restrictions on the size of the request that can be passed through them. If you’re building a blockchain application that needs to upload larger media content to IPFS, then you’re in a sticky spot.
This is why we created a new system for presigned URLs. These can be created in a secure server environment, set to expire within a designated number of seconds, then used in client side code to upload files to Pinata. In this post, we’ll show you how to setup a simple server in Hono to create presigned URLs as well as a classic Vite + React template to accept the URLs and upload files directly from the client. It’s a clean and elegant solution, and thanks to the Pinata SDK, all of it happens in less than 150 lines of code. Let’s dig in!
Setup
Before we get started, you’ll need just a few things. First you’re gonna need a free Pinata account, so create one now if you haven’t already. Then we’ll need to make an API key, which you can do on this page. Click on the “New Key” in the top right, give it a name, and give the key admin permissions for now.
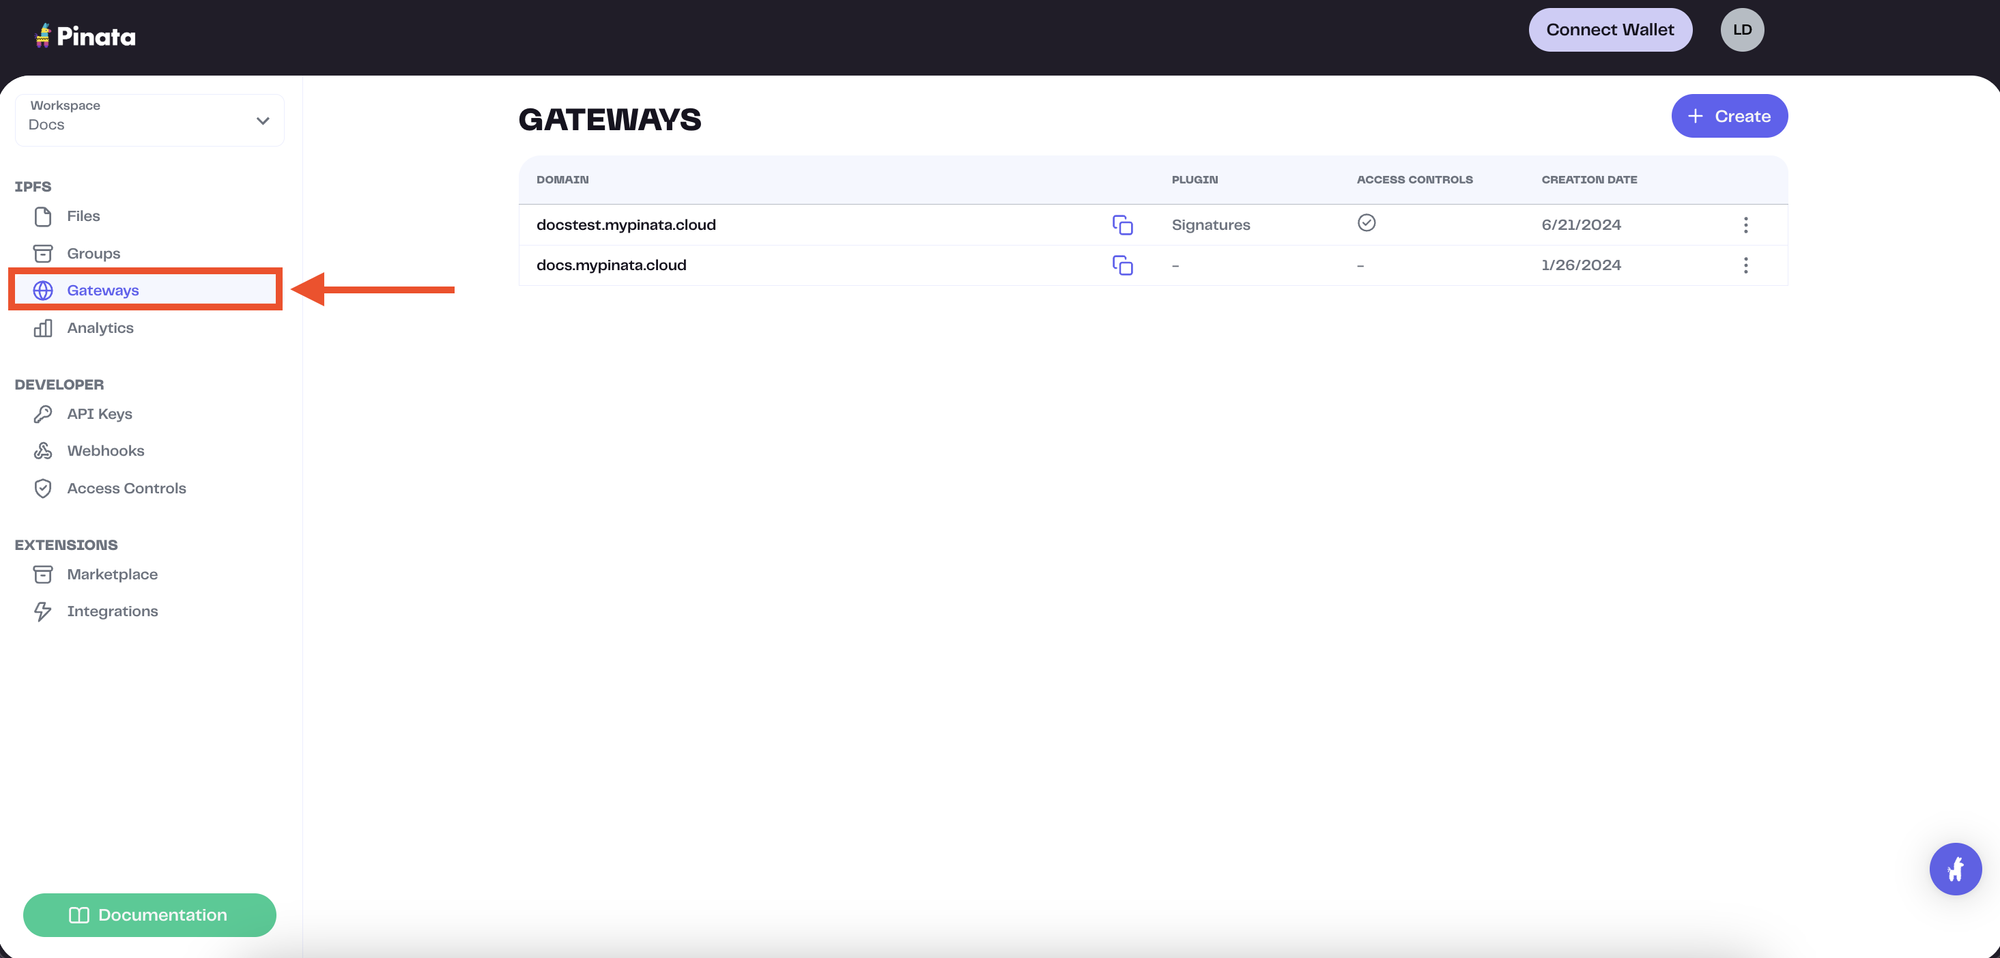
After creating the key, you should see a longer JWT. Save this somewhere safe and we’ll come back to it. Once you have your API key, the next thing you’ll need is your Dedicated Gateway URL. Click on the Gateways tab on the left sidebar then copy the domain name. That’s it!
The last thing you’ll need is Node.js installed (I would recommend using fnm), which you can verify if it works by running:
node --version
You’ll want at minimum version 20. Last but not least, you’ll need a text editor like VSCode, Cursor, Zed, etc. Now we can start writing some code!
Server
To start, we’ll need a server that secures our Pinata API key. In your terminal, run the following command:
npm create hono@latest pinata-server
This will give you a few different options to choose from - I would recommend the following:
create-hono version 0.16.0
✔ Using target directory … pinata-server
✔ Which template do you want to use? cloudflare-workers
✔ Do you want to install project dependencies? Yes
✔ Which package manager do you want to use? npm
Once it’s finished installing the dependencies, you can run the following commands to move into that directory and install the Pinata SDK.
cd pinata-server && npm i pinata
You can go ahead and open the project in your text editor now. The only environment variable we need to add is our Pinata API Key JWT. Make a new file in the root of the project called .dev.vars and paste in the following, with your API key JWT in the placeholder.
PINATA_JWT=YOUR_API_KEY_JWT_HERE
Now let’s open the src/index.ts file and paste in the following code.
import { Hono } from 'hono'
import { cors } from 'hono/cors';
import { PinataSDK } from 'pinata'

interface Bindings {
  PINATA_JWT: string;
}

const app = new Hono<{ Bindings: Bindings }>()

app.use(cors())

app.get('/', (c) => {
  return c.text('Hello Hono!')
})

app.get('/upload_url', async (c) => {

	// Handle Auth

  const pinata = new PinataSDK({
    pinataJwt: c.env.PINATA_JWT
  })

  const url = await pinata.upload.public.createSignedURL({
    expires: 60
  })

  return c.json({ url }, { status: 200 })
})

export default app
Why yes, backend can be simple and fun. :) We really only have a few things going on. To start we have some boilerplate to setup the PINATA_JWT as a binding for the worker as well as some cors setup, then we have the basic Hello Hono! endpoint for the root GET request. Next we have /upload_url route and this is where them magic happens. First, we initialize the PinataSDK with our API key, then we use await pinata.upload.public.createSignedURL() to make our temporary upload URL. We pass in the expires parameter to make it only valid for 60 seconds, then we simply send it back to the client. One important thing to note is that you will want to have some kind of auth in place with both your client and your server to keep it secure. Would highly recommend Privy for that!
Let’s test it out; after saving the file run the following command in the terminal:
npm run dev
By default, it should say the server is running at http://localhost:8787, so we can actually test it by pasting this curl command into a new terminal window:
curl <http://localhost:8787/upload_url>
This should return a JSON object with the presigned URL, sweet! Keep the server running as we’ll use it again soon while we build the client code.
Client
With our server running let’s make our frontend client. Back in your terminal run the following command:
npm create vite@latest pinata-client
Vite will give you several framework options, but for simplicity go ahead and select React and Typescript as the language. Once the project is created, let’s run the following commands:
cd pinata-client && npm i pinata
Let’s open this project in a new text editor window and start writing some code. Just like our server, we do have some environment variables, but these are not going to secret. These are public and are purely there so we can change between local and production environments. With that said, make a new file called .env.local with the following variables.
VITE_GATEWAY_URL=yourgateway.mypinata.cloud
VITE_SERVER_URL=http://localhost:8787
You’ll want to change out the gateway domain for the one you grabbed from your Pinata dashboard earlier, and for this tutorial we’ll leave the VITE_SERVER_URL as is since we have it running as we build this. Save and close that file and let’s open the src/App.tsx file and put in the code below:
import { useState } from 'react'
import reactLogo from './assets/react.svg'
import viteLogo from '/vite.svg'
import './App.css'
import { PinataSDK } from 'pinata'

const pinata = new PinataSDK({
  pinataJwt: "",
  pinataGateway: import.meta.env.VITE_GATEWAY_URL
})

function App() {
  const [file, setFile] = useState<File | null>(null)
  const [uploadStatus, setUploadStatus] = useState('')
  const [link, setLink] = useState('')

  const handleFileChange = (e: React.ChangeEvent<HTMLInputElement>) => {
    if (e.target.files && e.target.files.length > 0) {
      setFile(e.target.files[0])
    }
  }

  const handleUpload = async () => {
    if (!file) return

    try {
      setUploadStatus('Getting upload URL...')
      const urlResponse = await fetch(`${import.meta.env.VITE_SERVER_URL}/upload_url`, {
        method: "GET",
        headers: {
          // Handle authorization here
        }
      })
      const data = await urlResponse.json()

      setUploadStatus('Uploading file...')

      const upload = await pinata.upload.public
        .file(file)
        .url(data.url)

      if (upload.cid) {
        setUploadStatus('File uploaded successfully!')
        const ipfsLink = await pinata.gateways.public.convert(upload.cid)
        setLink(ipfsLink)
      } else {
        setUploadStatus('Upload failed')
      }
    } catch (error) {
      setUploadStatus(`Error: ${error instanceof Error ? error.message : String(error)}`)
    }
  }

  return (
    <>
      <div>
        <a href="<https://vite.dev>" target="_blank">
          <img src={viteLogo} className="logo" alt="Vite logo" />
        </a>
        <a href="<https://react.dev>" target="_blank">
          <img src={reactLogo} className="logo react" alt="React logo" />
        </a>
      </div>
      <h1>Vite + React + Pinata</h1>
      <div className="card">
        <input type="file" onChange={handleFileChange} />
        <button onClick={handleUpload} disabled={!file}>
          Upload to Pinata
        </button>
        {uploadStatus && <p>{uploadStatus}</p>}
        {link && <a href={link} target='_blank'>View File</a>}
      </div>
      <p className="read-the-docs">
        Click on the Vite and React logos to learn more
      </p>
    </>
  )
}

export default App
At the top of our file we initialize the PinataSDK again, but also with a different twist. The pinataJwt will be a blank string and we’ll input our pinataGatewayUrl from our environment variables. Then we have some basic state and utility functions to handle selecting our file. Our handleUpload is where a lot of the action is happening. First we make an API call to our server for a presigned URL. Generally this is something you also want to implement your own auth for and pass an access token into the headers. Once we have it then we can use this handy SDK method:
const upload = await pinata.upload.public
	.file(file)
	.url(data.url)
Instead of trying to upload with the primary upload endpoint in the SDK and authenticate it with a hard coded API key, we can simply send our upload to the url we just got! Pretty slick right? Once we upload the file, we’ll create a link to the file using the gateways.public.convert method and set that as our link in the markup. Go ahead and run npm run dev and make sure your server is still running on http://localhost:8787! In the end, you should have something like this:
Now if you prefer to skip all of this and have working templates from the start then you can check out the repos for both below!
Wrapping up
We might sound like a broken record at this point, but from the beginning in 2018, Pinata’s goal has been to make IPFS easy. Fast forward to the present and the evidence speaks for itself. There’s a reason over 600,000 developers trust in Pinata to reliably host their files, but if for some reason you’re still on the fence, just try it for yourself! I think you’re be surprised how good it is. :)
Happy Pinning!