
Back to blog

How to Upload Files in Rust

There are few languages that get a rouse out of developers more than Rust. When you strip away the memes and the lore behind this language, then you’ll find a robust ecosystem of developer apps, frameworks, even blockchains being built on Rust. In this tutorial, we’ll dip our toes into the deep waters of Rust and walk you through each step, so even if you have never used it before you’ll be safe and sound. Let’s dive in!
Setup
First thing first, you’ll want to make sure your develop environment is ready to go. With that, you’ll just need two things:
- A code editor like VSCode, Cursor, Zed, etc.
- Rust installed on your machine
Installing Rust is pretty easy, just use the following cURL script to start the install:
curl --proto '=https' --tlsv1.2 -sSf https://sh.rustup.rs | sh
If you’re on Windows, be sure to read the installation instructions here. Once you have Rust installed, try running these commands to make sure everything is working as expected.
cargo --version
rustc --version
Now let’s start up a new project using cargo, a package manager for Rust.
cargo new pinata_upload
This should create a new folder with our project files; let’s move into that directory and test to make sure everything is working as expected.
cd pinata_upload
cargo run
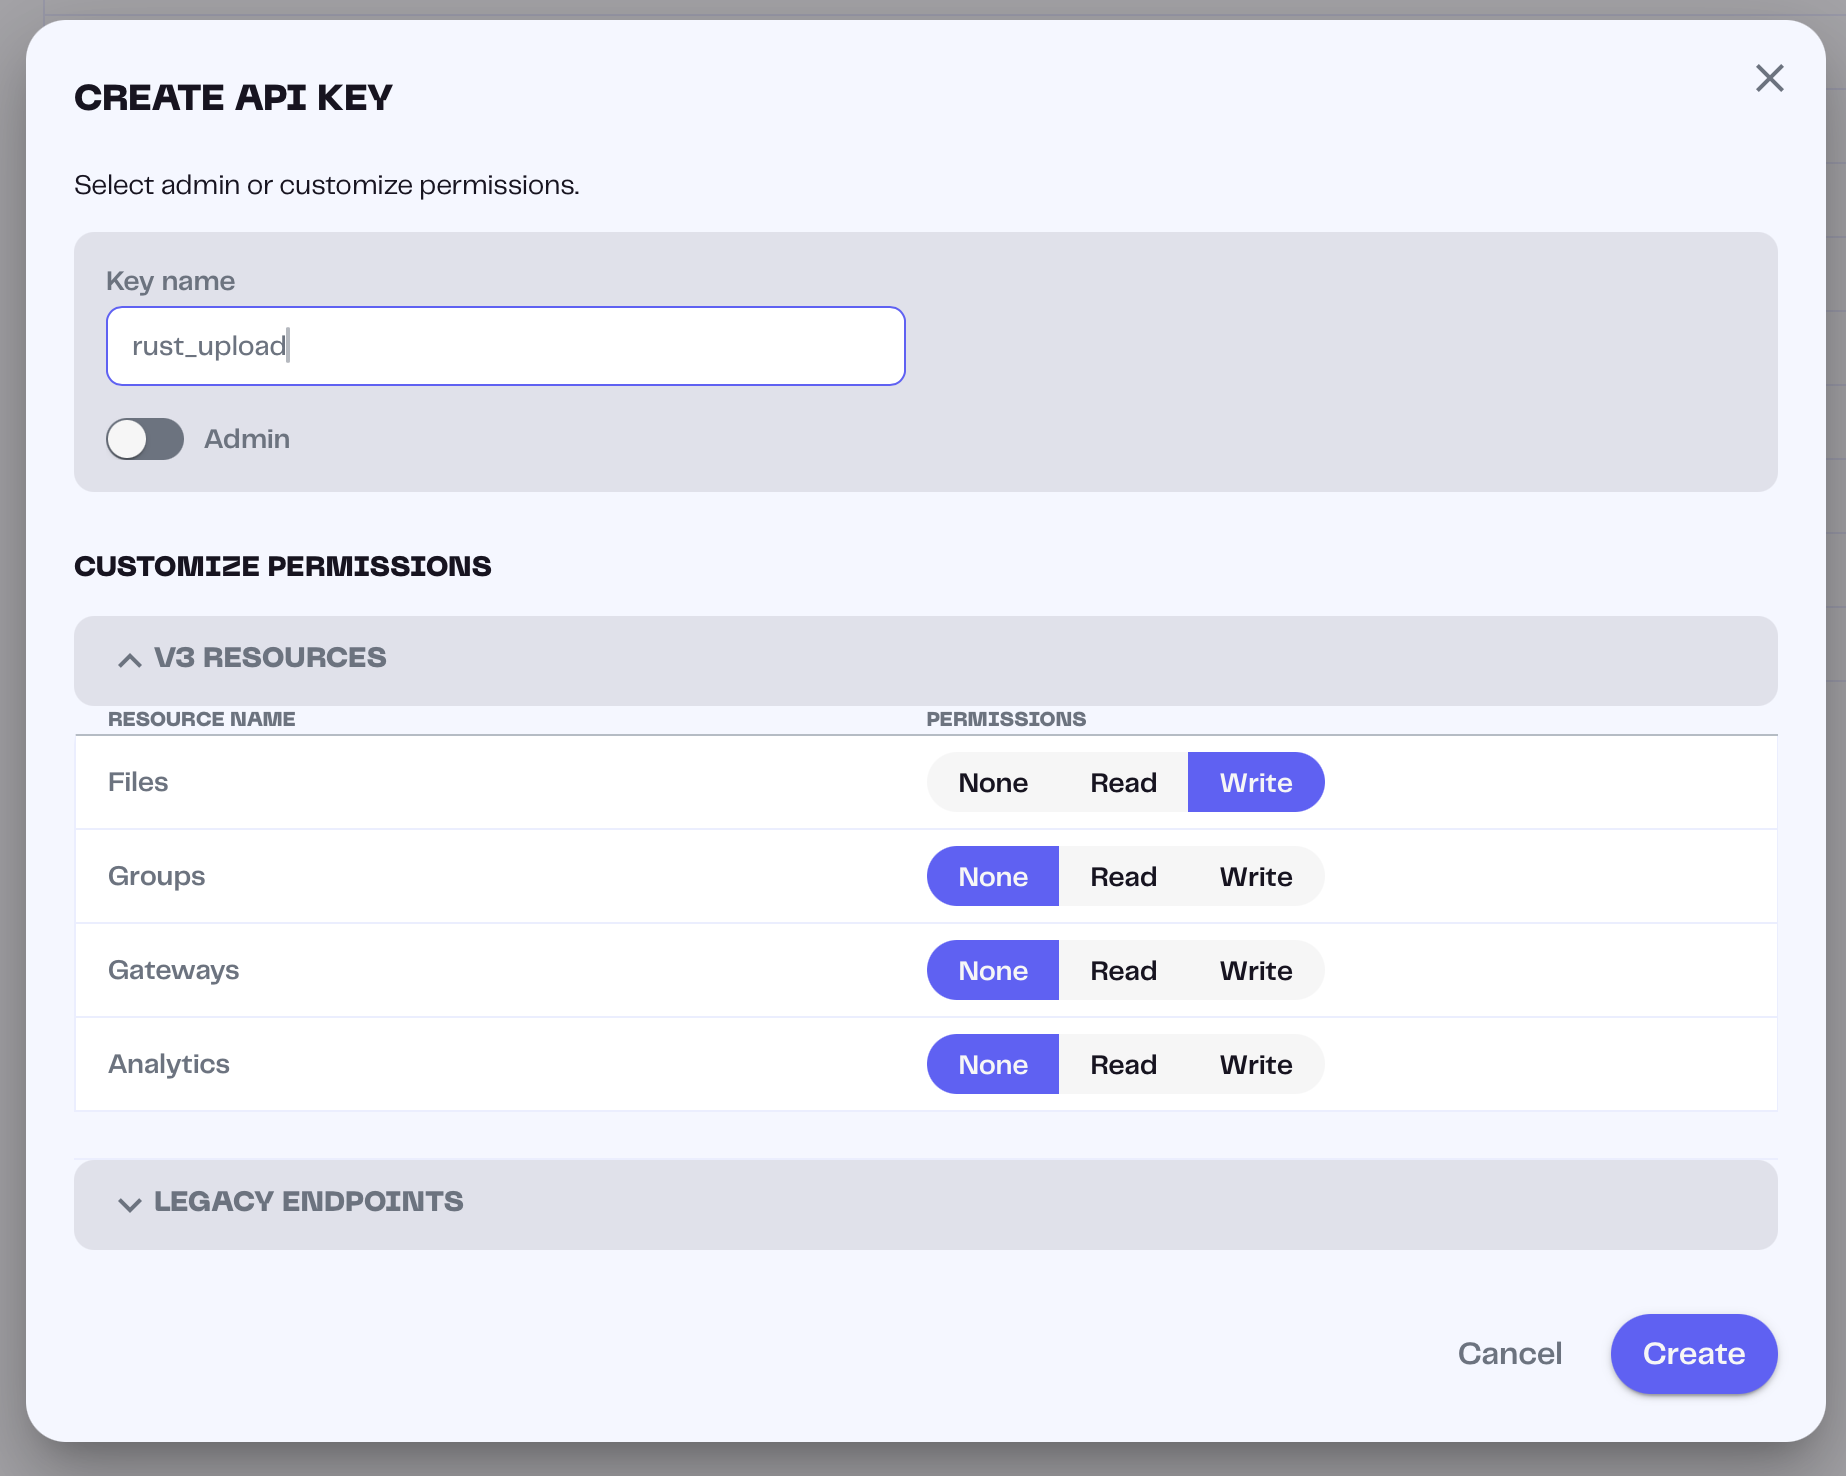
This should print a Hello, world! to your terminal, so we’re all set! We’ll edit our files soon, but the next thing we need is our Pinata API key and Gateway URL. If you haven’t already, go ahead and sign up for a free account here. Once you’re signed up, visit the API Keys page and create a new key in the top right. Give it a name that you can remember like rust_upload then give it a scope of files:write.
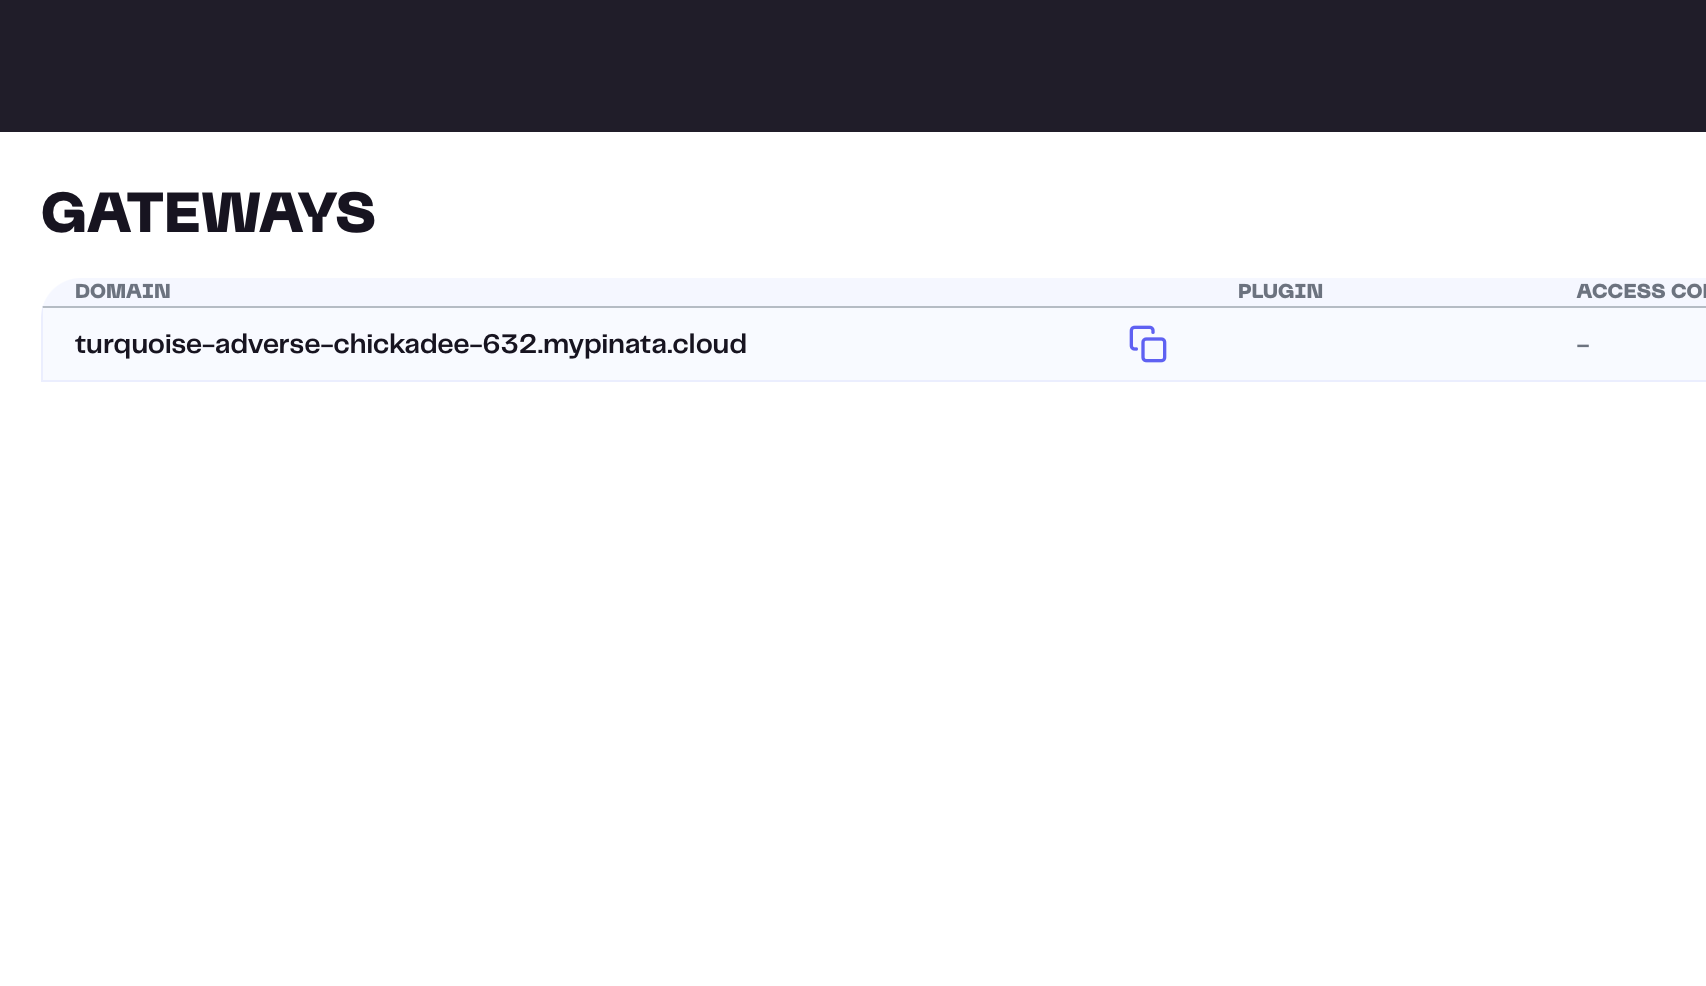
Once you create the API key, it will give you a JWT that you will want to save somewhere safe. Last thing we need to do is grab our Dedicated Gateway domain. Just visit the Gateways tab and copy the domain as you see it, and let’s store that with your API key for later.
Implementing Uploads
Now it’s time to actually start uploading some files! The cool thing about Rust is that it compiles to efficient binaries which can be run anywhere on your computer. With our little project we’ll make the smallest CLI that we can use wherever we want to upload a file to our Pinata account! To start, let’s open our pinata_upload project in our text editor and update the src/main.rs file.
use std::env;
use std::fs::File;
use std::io::Read;
use std::path::Path;
use reqwest::multipart::{Form, Part};
use reqwest::header::{HeaderMap, HeaderValue, AUTHORIZATION};
use serde::Deserialize;
use tokio;

#[derive(Debug, Deserialize)]
struct PinataResponse {
    data: PinataData,
}

#[derive(Debug, Deserialize)]
struct PinataData {
    cid: String
}

async fn upload_to_pinata(file_path: &str, jwt: &str) -> Result<PinataData, Box<dyn std::error::Error>> {
    // Prepare the file for upload
    let path = Path::new(file_path);
    let file_name = path.file_name()
        .ok_or("Invalid file name")?
        .to_str()
        .ok_or("File name is not valid UTF-8")?;

    let mut file = File::open(path)?;
    let mut buffer = Vec::new();
    file.read_to_end(&mut buffer)?;

    // Prepare headers with JWT auth
    let mut headers = HeaderMap::new();
    let auth_value = format!("Bearer {}", jwt);
    headers.insert(AUTHORIZATION, HeaderValue::from_str(&auth_value)?);

    // Create a client with proper headers
    let client = reqwest::Client::builder()
        .default_headers(headers)
        .build()?;

    // Prepare multipart form
    let file_part = Part::bytes(buffer)
        .file_name(file_name.to_string())
        .mime_str("application/octet-stream")?;

    // Set to "public" for public upload, "private" for private upload
    let network_part = Part::text("public");

    let form = Form::new()
        .part("file", file_part)
        .part("network", network_part);

    // Send the request
    let response = client.post("https://uploads.pinata.cloud/v3/files")
        .multipart(form)
        .send()
        .await?;

    if !response.status().is_success() {
        let error_text = response.text().await?;
        return Err(format!("Upload failed: {}", error_text).into());
    }

    // Parse the response
    let pinata_response: PinataResponse = response.json().await?;
    Ok(pinata_response.data)
}

#[tokio::main]
async fn main() -> Result<(), Box<dyn std::error::Error>> {
    // Get command line arguments
    let args: Vec<String> = env::args().collect();

    if args.len() != 2 {
        println!("Usage: pinata_upload /path/to/file");
        return Ok(());
    }

    let file_path = &args[1];

    // Get JWT from environment variable
    let jwt = env::var("PINATA_JWT").expect("PINATA_JWT environment variable must be set");

    // Get optional gateway URL
    let gateway_url = env::var("GATEWAY_URL").ok();

    // Upload file to Pinata
    match upload_to_pinata(file_path, &jwt).await {
        Ok(data) => {
            println!("File uploaded successfully!");
            println!("CID: {}", data.cid);

            // If gateway URL is provided, print the full gateway URL
            if let Some(gateway) = gateway_url {
                println!("Gateway URL: https://{}/ipfs/{}", gateway.trim_end_matches('/'), data.cid);
            }
        },
        Err(err) => eprintln!("Error: {}", err),
    }

    Ok(())
}
There’s a lot going on here, so let’s break it down piece by piece to see what’s going on.
use std::env;
use std::fs::File;
use std::io::Read;
use std::path::Path;
use reqwest::multipart::{Form, Part};
use reqwest::header::{HeaderMap, HeaderValue, AUTHORIZATION};
use serde::Deserialize;
use tokio;

#[derive(Debug, Deserialize)]
struct PinataResponse {
    data: PinataData,
}

#[derive(Debug, Deserialize)]
struct PinataData {
    cid: String
}
At the top of the file, we have some library imports. Some of them are standard libraries to read arguments from the terminal, read files, and there’s also some third party libraries like reqwest, serde, and tokio to handle API requests, serializing JSON, and handling async applications. Below our imports, we have some structs that will help us parse the upload response we get back and grab the cid. Now let’s look at our upload function.
async fn upload_to_pinata(file_path: &str, jwt: &str) -> Result<PinataData, Box<dyn std::error::Error>> {
    // Prepare the file for upload
    let path = Path::new(file_path);
    let file_name = path.file_name()
        .ok_or("Invalid file name")?
        .to_str()
        .ok_or("File name is not valid UTF-8")?;

    let mut file = File::open(path)?;
    let mut buffer = Vec::new();
    file.read_to_end(&mut buffer)?;

    // Prepare headers with JWT auth
    let mut headers = HeaderMap::new();
    let auth_value = format!("Bearer {}", jwt);
    headers.insert(AUTHORIZATION, HeaderValue::from_str(&auth_value)?);

    // Create a client with proper headers
    let client = reqwest::Client::builder()
        .default_headers(headers)
        .build()?;

    // Prepare multipart form
    let file_part = Part::bytes(buffer)
        .file_name(file_name.to_string())
        .mime_str("application/octet-stream")?;

    // Set to "public" for public upload, "private" for private upload
    let network_part = Part::text("public");

    let form = Form::new()
        .part("file", file_part)
        .part("network", network_part);

    // Send the request
    let response = client.post("https://uploads.pinata.cloud/v3/files")
        .multipart(form)
        .send()
        .await?;

    if !response.status().is_success() {
        let error_text = response.text().await?;
        return Err(format!("Upload failed: {}", error_text).into());
    }

    // Parse the response
    let pinata_response: PinataResponse = response.json().await?;
    Ok(pinata_response.data)
}
This function is going to take in both a file_path and a jwt which will authorize our request. Once we have a path, we’ll use our standard libraries to check the file, open it, and read the file into a buffer. When we prep our API call headers with our jwt to authorize the request, then we start to build the request with client. That includes creating form data with file_part and attaching the file buffer as well as the network we want to upload to public. Then we simple make the API request with client.post with our form, then parse the response. This function will be used in our main application below.
#[tokio::main]
async fn main() -> Result<(), Box<dyn std::error::Error>> {
    // Get command line arguments
    let args: Vec<String> = env::args().collect();

    if args.len() != 2 {
        println!("Usage: pinata_upload /path/to/file");
        return Ok(());
    }

    let file_path = &args[1];

    // Get JWT from environment variable
    let jwt = env::var("PINATA_JWT").expect("PINATA_JWT environment variable must be set");

    // Get optional gateway URL
    let gateway_url = env::var("GATEWAY_URL").ok();

    // Upload file to Pinata
    match upload_to_pinata(file_path, &jwt).await {
        Ok(data) => {
            println!("File uploaded successfully!");
            println!("CID: {}", data.cid);

            // If gateway URL is provided, print the full gateway URL
            if let Some(gateway) = gateway_url {
                println!("Gateway URL: https://{}/ipfs/{}", gateway.trim_end_matches('/'), data.cid);
            }
        },
        Err(err) => eprintln!("Error: {}", err),
    }

    Ok(())
}
In this main function, we’ll parse command line arguments for file path, grab the PINATA_JWT from the system environment as well as the GATEWAY_URL, then run the upload function. If successful, our app will print the resulting CID as well as a gateway link we can use to access it! Now, to test this out, you will need to export the environment variables to your shell like so.
export PINATA_JWT="YOUR_JWT"
export GATEWAY_URL="yourdomain.mypinata.cloud"
Then try running your command followed by the path to the file you want to upload. If you need something to upload try this image of Pinnie.
cargo run pinnie.png
If it works, then you should get this printed in the terminal!
    Finished `dev` profile [unoptimized + debuginfo] target(s) in 0.04s
     Running `target/debug/pinata_upload pinnie.png`
File uploaded successfully!
CID: bafkreih5aznjvttude6c3wbvqeebb6rlx5wkbzyppv7garjiubll2ceym4
Gateway URL: https://dweb.mypinata.cloud/ipfs/bafkreih5aznjvttude6c3wbvqeebb6rlx5wkbzyppv7garjiubll2ceym4
How about that - you built a CLI in Rust! Now if we wanted to make this a binary we can run anywhere on our machine you can do the following:
- Run
cargo run build --releaseto build an optimized binary - Move the produced binary to a bin folder that’s part of your path, eg.
cp target/release/pinata_upload ~/.local/share - Securely export your
PINATA_JWTandGATEWAY_URLto your system environment using a combination of a password manager like 1Password and your.bashrcor.zshrcfile, or go deeper in Rust to store your JWT in a secure dot file and have the program pull it from there instead
Now you can run pinata_upload anywhere on your computer to upload a file at blazing Rust speeds 🦀
While it’s unlikely you might ever use Rust again, it’s good practice to try other languages to see how they work. Each one has it’s own specific purpose, and if you’re using Pinata you can rest assured that our APIs will be a breeze to implement no matter what language you choose. Give it a shot today with a free account and experience the best uploading experience for blockchain storage.
Happy Pinning!